
Vlocity Pricing Designer manages Pricing options. This app comes out of the box in newer Vlocity installations, but if it isn’t, don’t panic! Keep reading.
If you’ve searched high and low and the Pricing Designer is missing. You’ll have to install the Pricing Designer in the Salesforce Industries Org. This usually happens with older orgs that have previous versions of Vlocity that predate the launch of Vlocity Pricing Designer.
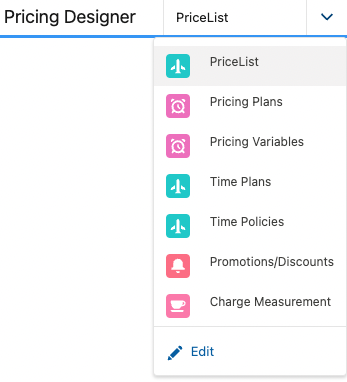
Vlocity Pricing Designer app is the new way to manage Price List and all related elements all under a single roof:
- Price Lists
- Pricing Plans
- Pricing Variables
- Time Plans
- Time Policies
- Promotions
- Charge Measurements
You could however manage these from the old Vlocity Product Console, but it’s obsolete and very difficult to navigate. I highly recommend using the Vlocity Pricing Designer when configuring Price Lists and related items in Salesforce Industries.

Setup the Lightning App
- Go to Setup and type in App Manager and click on the App Manager
- Scroll down and double check that the Vlocity Pricing Designer is indeed NOT installed in the org.
If you can’t find it, Set up the Pricing Designer Lightning app.
If you did find it, make sure you have permission to see the app.
If you see Pricing console instead of Pricing Designer, rename it
You can either leave it as is and use that since they do the same and it’s the same app or rename it to Vlocity Pricing Designer to avoid confusion.
Renaming the App to Pricing Designer (optional)
- From the App Manager, locate the Pricing Console and click on the Down arrow on the right of the name and click Edit
- On App Settings > App Details and branding, change the App Name to Vlocity Pricing Designer
- Click Save

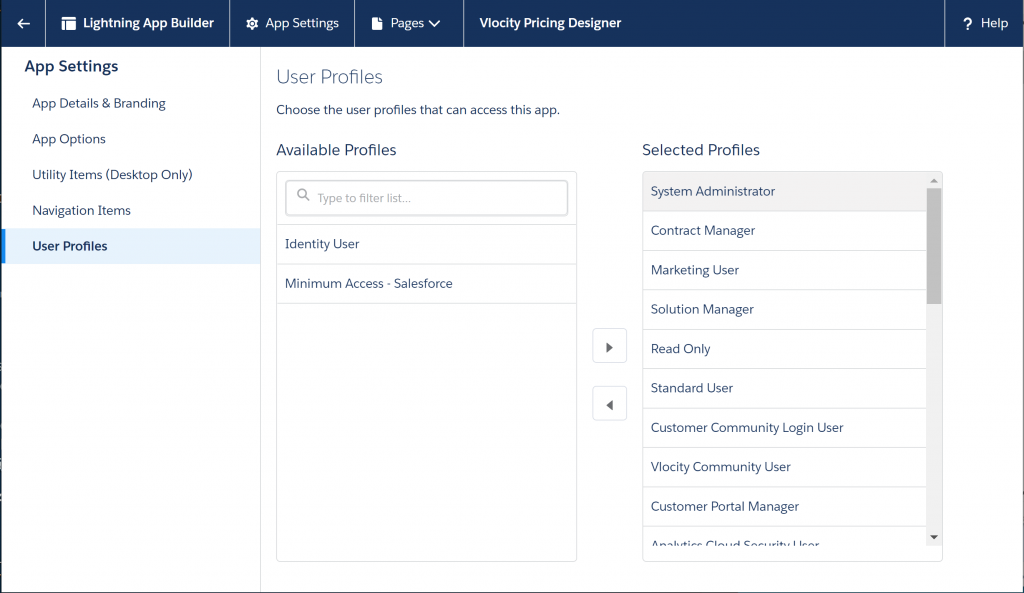
Make sure your profile is allowed to use the app
- In the App Settings column, click User Profiles
- Check that your Profile is in the Selected Profiles column
Configure the Lightning Record Pages for these the Pricing Designer Objects
The following steps need to be applied to the following objects. Start with Price List and once you’re done go back here and repeat the same steps with Pricing Plan and so on and so forth until you’re done with Charge Measurement which is the last on the list.
| [Object Name] | [Lightning Record Page] | [Record Type] |
|---|---|---|
| Price List | Vlocity EPC Price List Page | Master |
| Pricing Plan | Vlocity EPC Pricing Plan Page | Master |
| Pricing Variable | Vlocity EPC Pricing Variable Page | Master |
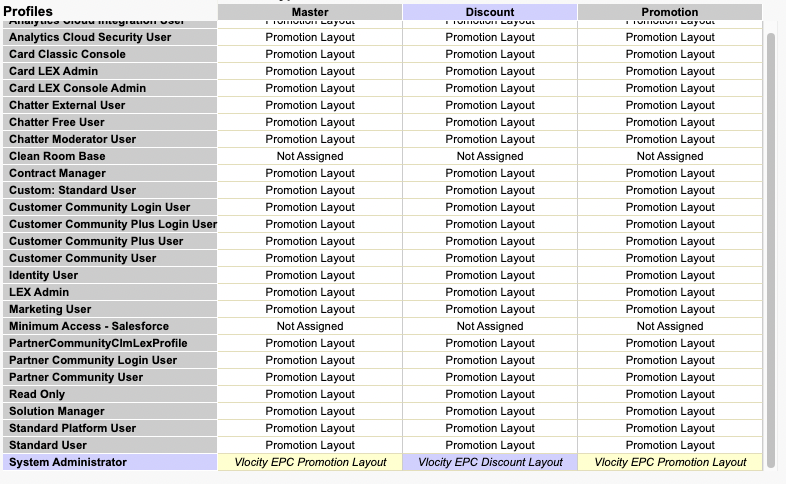
| Promotion | Vlocity EPC Promotion Page | Master, Promotion |
| Promotion | Vlocity EPC Discount Page | Discount |
| Time Plan | Vlocity EPC Time Plan Page | Master |
| Time Policy | Vlocity EPC Time Policy Page | Master |
| Charge Measurement | Vlocity EPC Charge Measurement Page | Master |
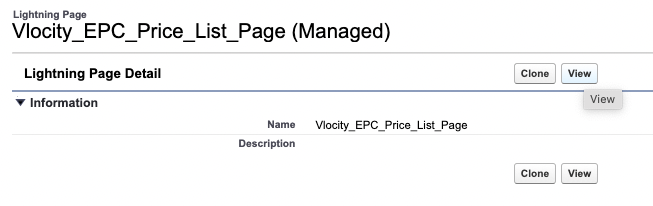
- From Setup, go to Object Manager and type in [Object Name] and open the object
- On the left panel, click on Lightning Record Pages
- Open [Lightning Record Page] and click on View/Edit
- The Lightning App Builder will open the page, click on the Activation button on the top right
- Click on APP, RECORD TYPE AND PROFILE and click on Assign to App, Record Types and Profile button.
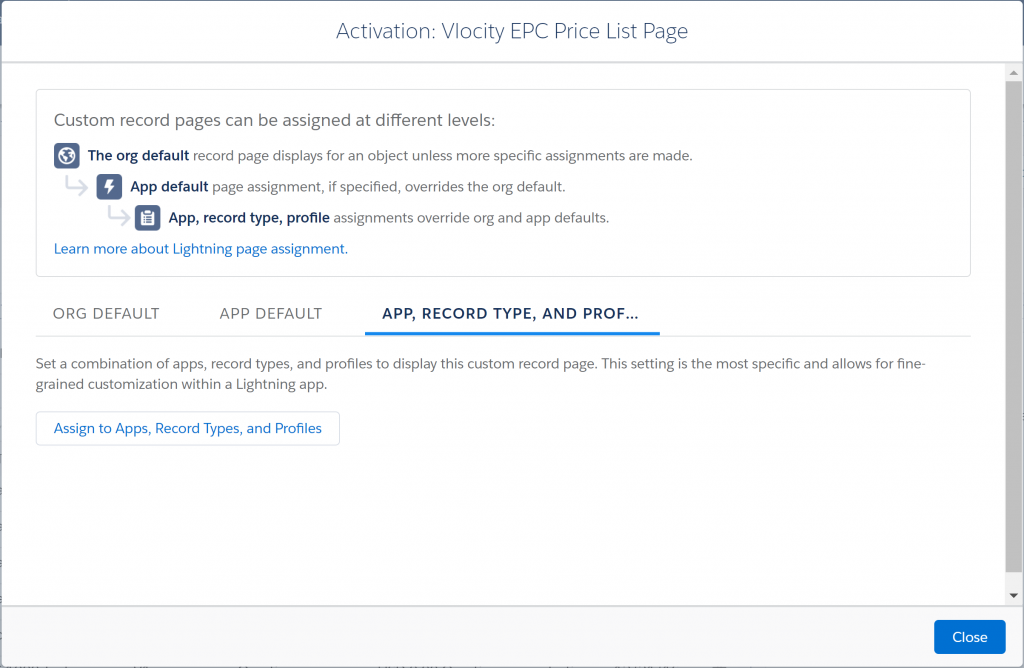
- At the bottom of the list, find Vlocity Pricing Designer and Vlocity Product Designer, check both and click Next
- Note: You only need the Pricing Designer, but I like to check both in case Pricing designer is inaccessible or broken anyway, then I’ll still be able to access the features from the Product Designer, and I won’t have to go back and repeat this step with all the Objects once I find out that Pricing Designer is broken
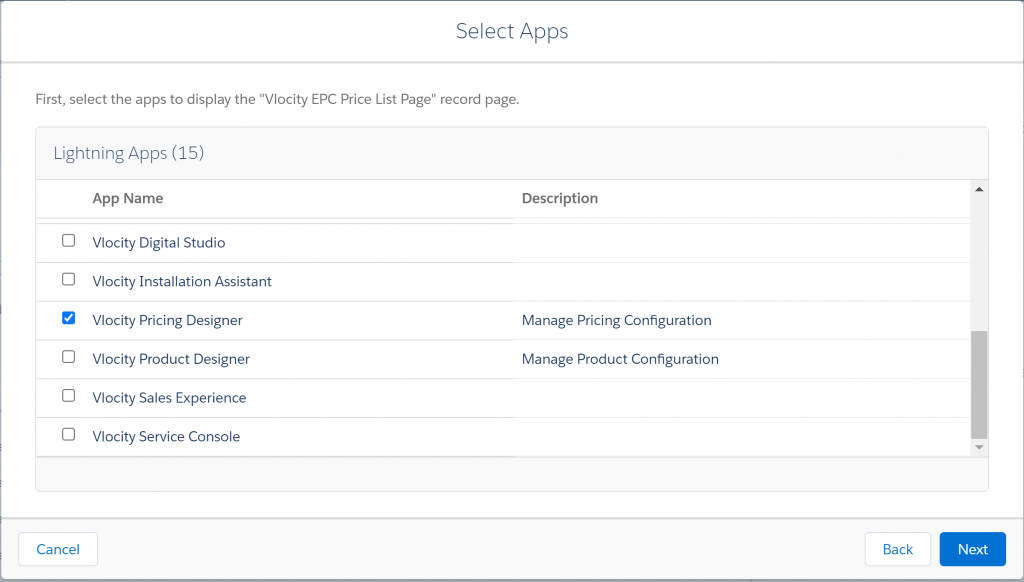
- On Form Factor screen, Desktop should be checked, then hit Next
- Check [Record Type] for the Record Type and then Click Next
- Select all the Profiles you want this visible to, obviously as System Admins, we’ll check that one
- Click Next and then Save
- The Lightning Record Page is activated, click the back arrow on the Lightning App Builder header in the top left corner
Now go back up and do the same with the rest of the objects in the table until the last.
Assign Page Layouts for these Objects to System Admin (or your Profile)
Like the previous step, the following steps need to be applied to this list of objects. Start with Charge Measurement (since you’re already here) and once you’re done go back here and repeat the same steps with Pricing Plan and so on and so forth until you’re done with Pricing Variable Binding which is the last on the list.
| [Object Name] | [Page Layout] | [Record Type] |
|---|---|---|
| Price List | Vlocity EPC Price List Layout | Master |
| Pricing Plan | Vlocity EPC Pricing Plan Layout | Master |
| Pricing Plan Step | Vlocity EPC Pricing Plan Step Layout | Master |
| Pricing Variable | Vlocity EPC Pricing Variable Layout | Master |
| Promotion | Vlocity EPC Promotion Layout | Master, Promotion |
| Promotion | Vlocity EPC Discount Layout | Discount |
| Pricing Variable Binding | Vlocity EPC Pricing Variable Binding Layout | Master |
- From the Object Manager, find the [Object Name] and open it
- On the left pane, open Page Layouts
- Click on Page Layout Assignments button in the top right corner.
- Click Edit Assignment.
- Select System Administrator or your profile, it will turn purple
- In the Page Layout To Use picklist, choose the [Page Layout] See table
- In Promotion, there’s more than one Record Type, choose accordingly, others is just Master
- Click Save.
Now go back up and do the same with the rest of the objects in the table until the last.
Configure Compact Layouts for Highlights Panel
Just like previous steps, go through every object in the list until the last.
| [Object Name] | [Compact Layout] | [Record Type] |
|---|---|---|
| Pricing Plan | Vlocity EPC Pricing Plan Compact Layout | Master |
| Promotion | Vlocity EPC Promotion Compact Layout | Master, Promotion |
| Promotion | Vlocity EPC Discount Compact Layout | Discount |
- From the Object Manager, find the [Object Name] and open it
- On the left pane, open Compact Layouts
- On the top right corner, open Compact Layout Assignment
- Click on the Compact Layout Assignment button
- Click Edit Assignment button
- Select the [Compact Layout] as Primary and click Save
- For Promotions, make sure you assign each [Record Type] accordingly
Now go back up and do the same with the rest of the objects in the table until the last.
Remove unnecessary Actions from the Page Layouts for this App
Just like previous steps, go through every object in the list until the last.
| [Object Name] | [Page Layout] |
|---|---|
| Price List | Vlocity EPC Price List Layout |
| Pricing Plan | Vlocity EPC Pricing Plan Layout |
| Pricing Variable | Vlocity EPC Pricing Variable Layout |
| Promotion | Vlocity EPC Promotion Layout |
| Promotion | Vlocity EPC Discount Layout |
| Time Plan | Vlocity EPC Time Plan Layout |
| Time Policy | Vlocity EPC Time Policy Layout |
- In Object Manager, open [Object Name]
- On the Left pane, open Page Layouts
- Open [Page Layout]
- In the Salesforce Mobile and Lightning Experience Actions section, click the Override the predefined actions

- Remove all the actions in this section by dragging and dropping them in the button list above (gray)
- Click Save when done.
Now go back up and do the same with the rest of the objects in the table until the last.
Yeah, this is a time-consuming task. I’m sorry, yeah, that’s vlocity.
Add the Default Price List field to the Catalog page layout
- From Setup, open Object Manager
- Find the Catalog object and open it
- On the left side pane, click on Page Layouts
- Open Catalog Layout (Vlocity)
- In the page layout list, click Fields
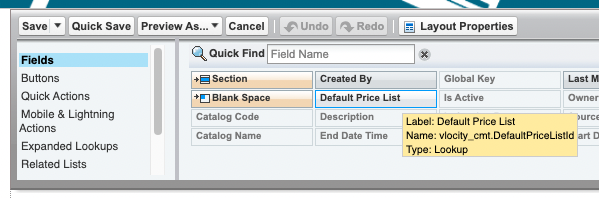
- Drag Default Price List and drop it under the Catalog Detail section
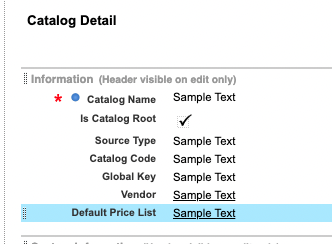
- Click Save
Add additional Columns to the Pricing Plan table
- From the Object Manager, open the Pricing Plan Object
- From the left pane, click on Page Layouts
- Open the Vlocity EPC Pricing Plan Layout
- In the Related Lists section, click the wrench icon next to the minus button

- In the Available Fields, find Implementation Name and Method Name and add them to Selected Fields side.
- Click OK and Save.
Add necessary buttons to Promotion List View
- From the Object Manager, open the Promotion Object
- On the left pane, click on List View Button Layout
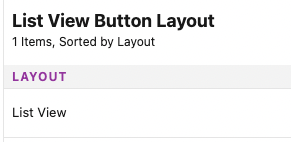
- From the Standard Buttons section, unmark New [New].
- In the below section of Custom Buttons, move New Promotion and New Discount to theSelected Buttons list
- Click Save
Rename Promotion tab to Plural (Optional)
- From Setup, open Rename Tabs and Labels
- In the Custom Tabs section, find Promotions and hit Edit
- In Plural field, change it to Promotions/Discounts
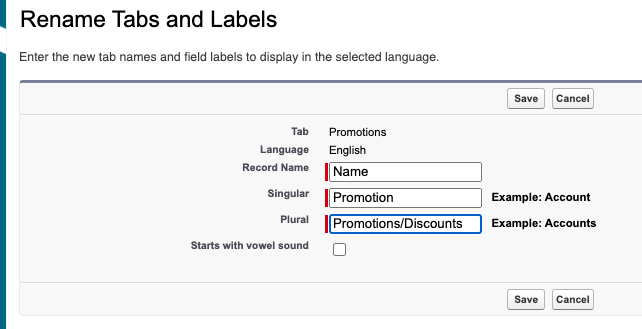
- Click Save
Test the Vlocity Pricing Designer
Now that you’ve completed all the steps, check if you can now use the Pricing Designer by searching the app from the App Launcher.
If you can see the Pricing Designer
If the installation and configuration was successful (and provided your Org doesn’t have an old vlocity package) and you were able to now access the Vlocity Pricing Designer, now let’s make sure all the tabs are showing.
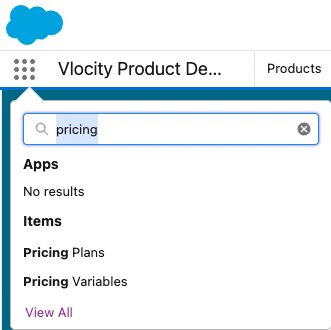
How to fix missing tabs from the power launcher in Vlocity Pricing Designer
- Price Lists
- Pricing Plans
- Pricing Variables
- Promotions and Discounts
- Time Plans
- Time Policies
- Charge Measurements
If any of these are not showing, add them to the Power launcher
If you still can’t see the Pricing Designer
If you type in “Pricing” and you still can’t see the app, this could be an old org or there’s some fault in the Vlocity installation. Nevertheless, this isn’t the end.
Remember I mentioned earlier to also add the lightning pages to Product Designer? Well, it was for cases like this.
You can access all the objects related to Pricing from the app launcher while on the Vlocity Product Designer app. Is not ideal but it’s a workaround and it’s usable.
For more information on Lightning Apps, see SF help.

1 Response
[…] the entirety of this tutorial, we’ll be doing everything through the Vlocity Pricing Designer […]