
Price Lists contain price entries from Products. You can create Price Lists for Wholesale or Retail customers, since a Product can have more than one entry on a Price List and using Context Rules, it uses the right price for the right context, like what kind of account is buying.
Price Lists can also be created from the Vlocity Product Console but this is outdated and not recommended. Only do so if Vlocity Pricing Designer doesn’t work.
Whenever you create a Product or add/change Prices, they all end up on the designated Price List.
Create Price Lists in Vlocity Pricing Designer
- Open the App Launcher and type in
Priceand open Vlocity Pricing Designer
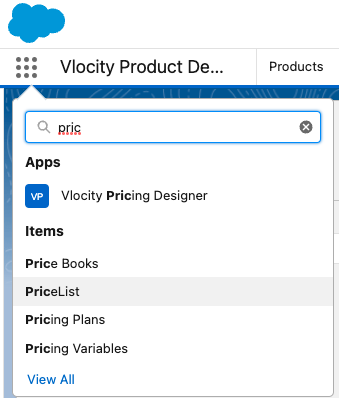
- In the Power menu, click the down arrow and select PriceList if it isn’t selected already
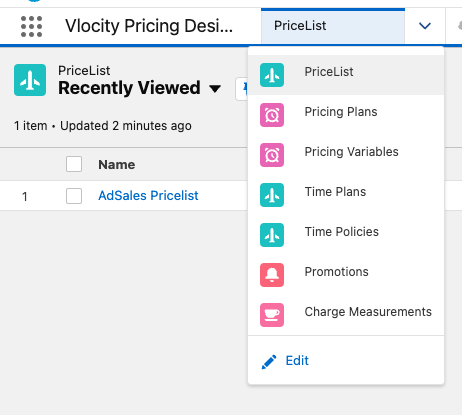
- On the Top Right corner, click New PriceList button

- On the new screen, fill out the necessary information:
- Name: Any descriptive name you wish to use for your Price List
- Code: Must be Unique across Price Lists and it is recommended to use all caps and no spaces
- Description: Optional, you can describe the use for this Price List
- Parent Price List: Optional. Use this if you want to nest this Price List under another. A child Price List takes all the Pricing from it’s parent but you can define certain exceptions
- Sequence: the order of appearance for this Price List, for example: 01, 02, 03. You can leave empty if you want
- Price Book: All Price Lists must be associated with a Salesforce Price Book. You can create a new one or just use the Standard Price Book provided by default. You can create Price Lists and associate all of them to the default Standard Price Book and the entries in the Salesforce Price Book do not affect the Price List. It just needs to be linked to it to work.
- Currency Code: select the Currency for the prices in this List, for example: USD. To select, move them to the Selected column using the arrows.
- Loyalty: If there’s a loyalty program applied to this, select it. This is optional.
- In the Effectivity section, set it as Active and set a date in Effective From that is in the past if you want the Price List active right now or set it in the future if this will take effect later. The Price List won’t be available until the date comes.
- Effective Until is optional. Only fill it out if you have an expiration date for this price list, when the date comes, the Price List will not be available for use.
- Click Done at the bottom of the page (you may have to scroll down)
It may take a few seconds to load the page, be patient.
About Pricing Variables and Pricing Elements
Pricing Variables and Pricing Elements are part of Pricing Components that make up the Prices in Vlocity Products. They can change or adjust Products base prices, apply discounts and define if something is a Cost to the company or a Charge to the customer.
Normally, if you use the Vlocity Product Designer, you won’t have to worry about these, they are set up or reused under the hood when you set up Products and add Price Entries to Price Lists. They were required to setup prior to creating Products using the Vlocity Product Console.

3 Responses
[…] can add multiple price entries to Products in different Price Lists and be part of Bundles and Offers. Vlocity Products take one step further, optimizing and […]
[…] If you don’t know how to create a Price List, check out this tutorial: How to create Price Lists […]
[…] if you have newly created Vlocity Products, Attributes, Price Lists, Object Types that don’t yet have a Global Key, then you might run into this error, say for […]