
Salesforce Fields and Vlocity Attributes are divorced from each other. With Attribute Binding, changes you make in the Attribute are automatically changed in the Field as well. For example, pass down options you’ve chosen in the cart downstream to Order/Opportunity/Quote Line Item or upstream to Opportunity, Order and more.
Step 1 – Choose a Salesforce Field to bind
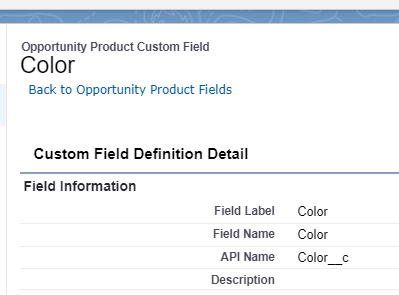
For the sake of this tutorial, I created a Custom Text Field in the Opportunity Product Object called Color to store my color selection from the cart. Your field can be any kind of field that mirrors the Attribute you’ll link with Attribute Binding.
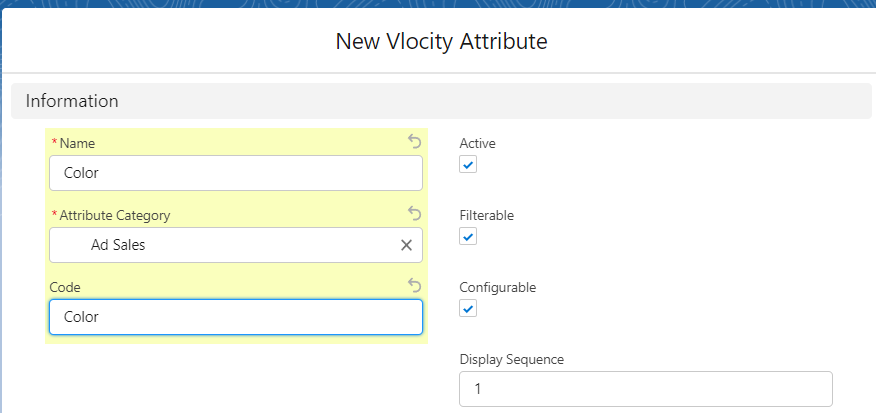
Step 2 – Create an Attribute to use for this
If you already have an Attribute, skip this step.
First, you’ll need to create an Attribute Category to put your Attribute into and then create an Attribute.
Make sure your new Attribute matches as best as possible the Salesforce Field you want to update with it.
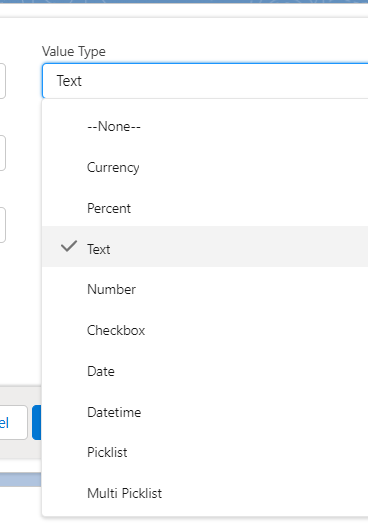
For example, if it’s a Picklist, then the API names of the values should match the Values in the Attribute’s Picklist. If the Salesforce Field is Date, then the Attribute’s Data type should be Date as well.
When you’re ready, come back to Step 2.
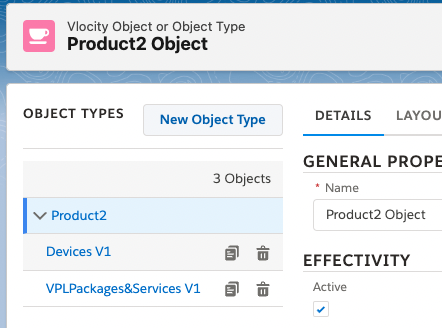
Step 3 – Create a Vlocity Object
This object will represent the Salesforce Object your field belongs to in the Vlocity ecosystem.
From the App launcher, Type in Object and open the Vlocity Object and Object Types. On the right side, there should be a New button (or so says Salesforce, but it’s usually never there). This step can be tricky because most Vlocity orgs come without the button to create New Vlocity objects.
You can later bind more fields within the same object using this Object Type.
If your org doesn’t show the “New” button do this
Create an Object Type under Product2
If you want more detailed instructions, read: how to create an object type
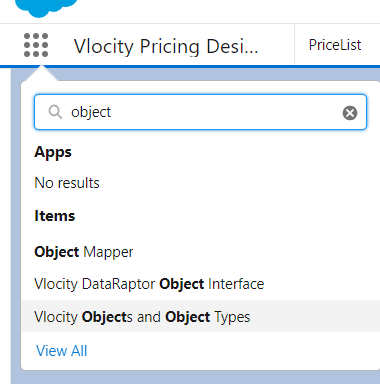
- From the App Launcher, open the Vlocity Product Designer
- From the Power launcher, open Vlocity Objects and Object Types, if you can’t see it there, just open the App Launcher and type “Object Types” and launch that. It’s important to do so from the Product Designer so that you can see the correct layout interface.
- Open Product2
- Click New Object Type button
- Fill out the name as the Salesforce Object you want to map out. For this tutorial, I’ve chosen to map OpportunityLineItem
- Leave everything else blank and Click Done
Don’t worry if it gives you an error, refresh the page and check that the object type has been created on the left side. If not, then try creating it again.
Transform it into a Vlocity Object
From the App launcher, Open any other App that isn’t Product Designer. We want to access the traditional Salesforce record view. For this tutorial, I’ve chosen Pricing Designer.
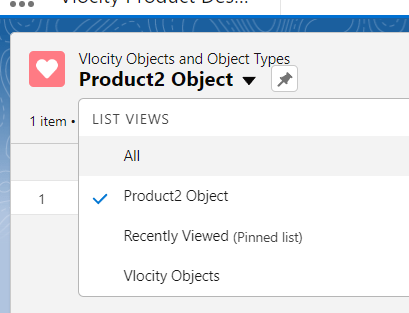
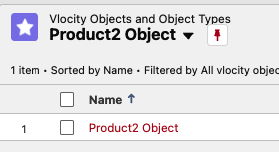
Open the App launcher (again) and type in Object and open the Vlocity objects and Object Types.
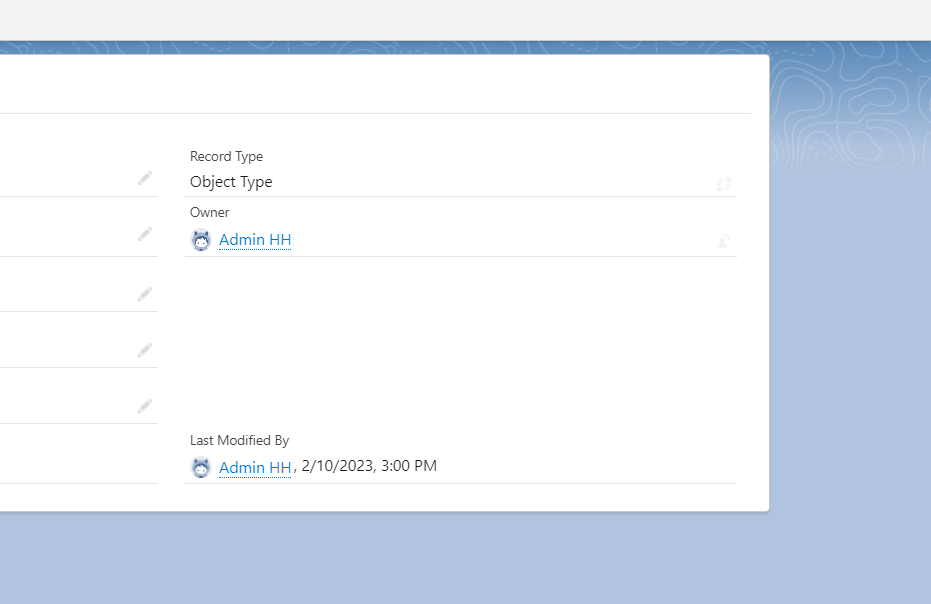
Open the Object Type you just created. If you can only see Product2 because it’s the pinned view, change it to All
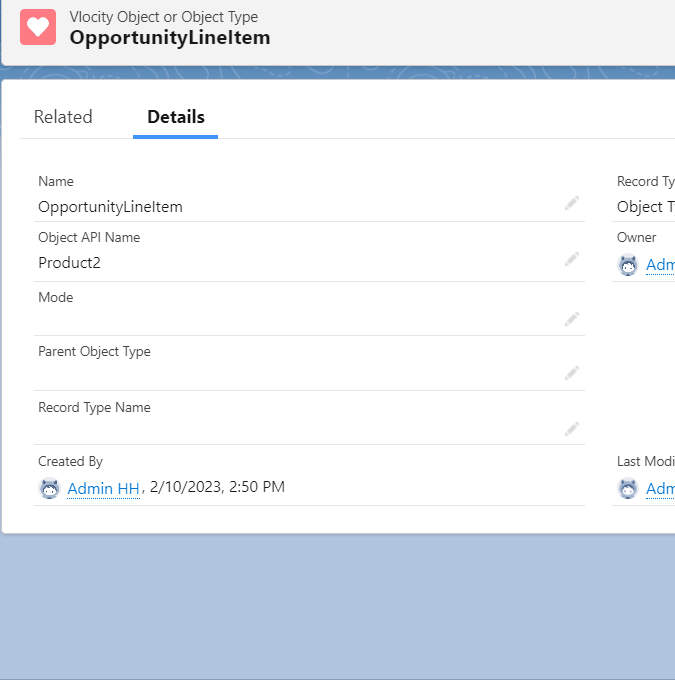
In this case OpportunityLineItem.
- Change Mode to Record Type
- Change Object API Name and Record Type Name to OpportunityLineItem (which is the object we’re binding to)
- Mode and type in the Object API name in the Record Type Name field and click Save
Now, change the Record Type by clicking the symbol on the right of the field. A popup will appear to change the record type. Change it Object. It will prompt you to modify fields but leave as is and click Save.
Now, let’s create the Attribute Binding.
Set Permissions to edit Vlocity Objects if needed
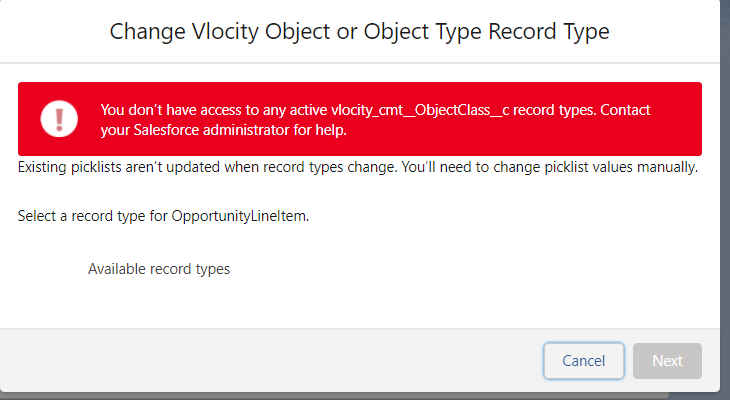
If you get this error, saying that You don’t have access to any active vlocity_cmt__ObjectClass__c record types. Contact your Salesforce administrator for help. All you need is to create a Permission Set.
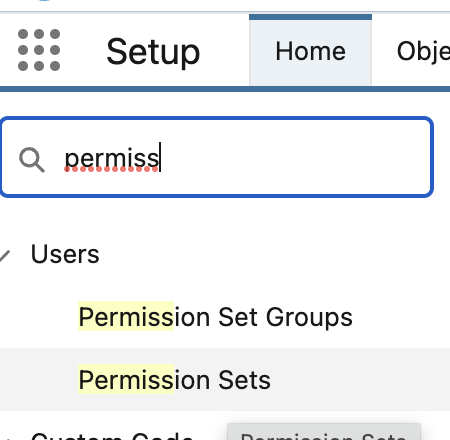
Go to Setup > Permission Sets
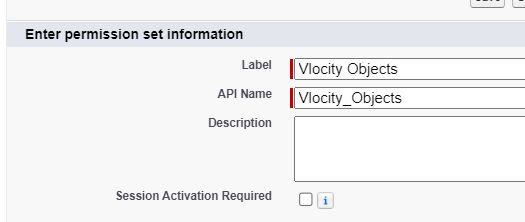
Name it something appropriate, like Vlocity Objects
Click on Object Settings
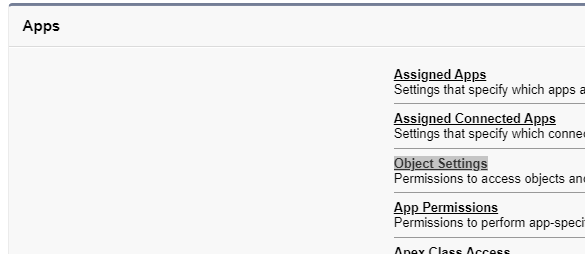
Scroll all the way down and open Vlocity Objects and Object Types. Click Edit.
Check the boxes for Assigned Record Types
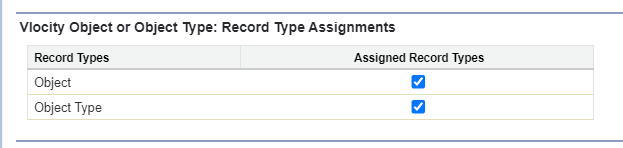
Click Save
Click on Manage Assignments to assign your User this Permission Set.
- Click on Add Assignment
- Check the box next to your User
- Scroll down and click Next at the bottom right
- Select No Expiration Date
- Click Assign at the bottom right.
Now you can go back to changing the record type Step.
Step 4 – Create the Attribute Binding
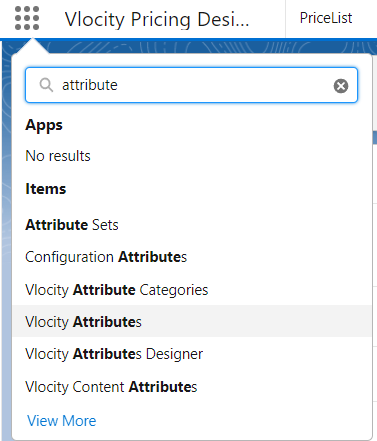
Let’s go back to our Pricing Designer Tab. From the App Launcher, open Vlocity Attributes.
Open the Attribute you created in Step 1, or the Attribute you’ve chosen to bind to a Salesforce Field. For the sake of this tutorial, I created a field in Opportunity Product (OpportunityLineItem) called Color to store the chosen Color Attribute in the cart in this field.
Click the Related Tab to see the Vlocity Attribute Binding list.
If you can’t see the Vlocity Attribute Binding Related List
- Click the configuration cog on the top right corner
- Click Edit Page and click on the Record detail component to reveal the Page Layout you’re using.
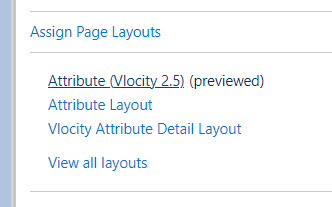
- Open the Layout that says Previewed (opens in a new tab).
- Click on Related Lists
- Search for Binding on the Quick Find bar and drag and drop it into the Related Lists section below
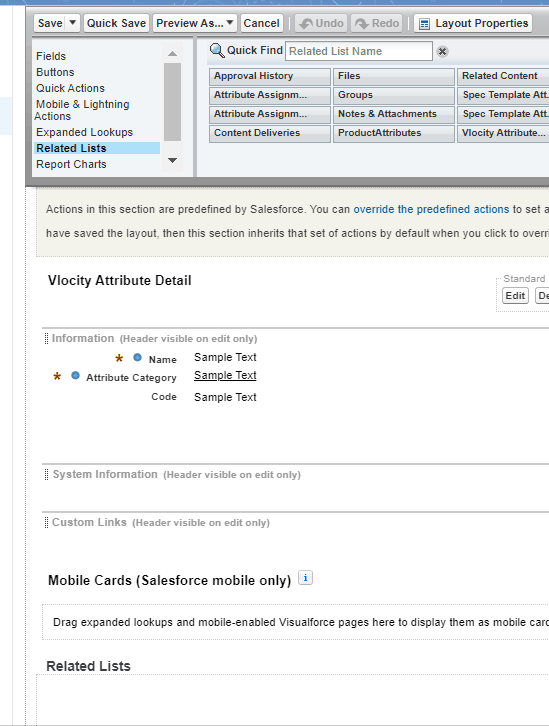
- Click Save
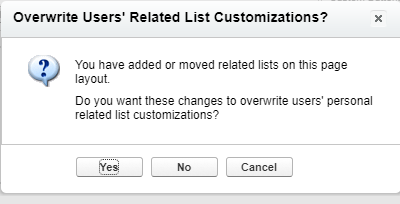
If you get a notice about overwriting user’s Related Lists Customizations, just click Yes.
On the previous tab (Edit Page) click the back button and say discard the changes notice. You’ll be back at Attribute Record page. You can now continue to Related Tab.
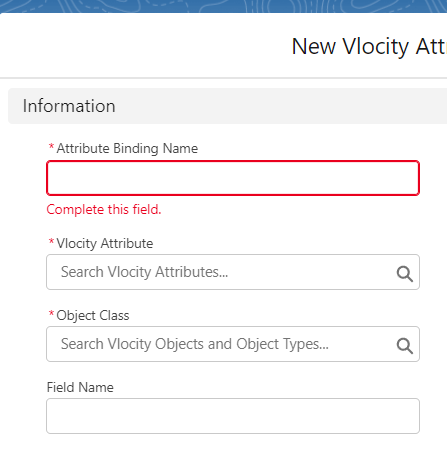
On the Vlocity Attribute Bindings List, click the New button.
You should see 4 Fields.
- In Name you fill in anything you want, I use the API name of the object followed by the API name of the field to keep things tidy (without spaces)
- in Vlocity Attribute lookup, find the Attribute you want to bind to the Salesforce field
- in Object Class lookup, find the Object Type you previously created for this purpose. Remember you can bind multiple Salesforce fields with the Object Type.
- In Field Name type in/paste the API name of the Salesforce Field you want to bind to the Attribute.
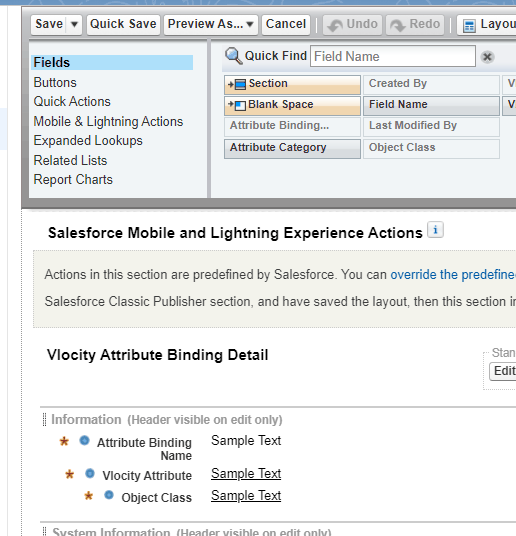
If you don’t see all four fields (mine didn’t show Field Name):
- Click on the configuration Cog on the top right corner
- Click on Edit Object
- Open Page Layouts tab
- Open the Page Layout (there should be only one)
- Drag Field Name from the Field section and drop it under the other 3 fields
- Click Save and return to the other browser tab to continue
Now, back at creating the Binding, refresh the page to see all four fields and fill accordingly.

Step 5 – Apply/Add the Attribute to the Product’s Object Type
For the binding to apply, all you need is to have the Attribute added to the Object Type of the Products you want. That is, as long as it shows in the Product layout in the cart, it will be bound.
Adding an Attribute to an Object Type.
Remember to clear your cache and refresh it for best results. You can test this out by adding a product in the cart, setting a value for the attribute and then checking out the record produced and the Salesforce field should now have the value assigned.

Hi
is this type of Binding also working the other way?
Im trying so preset Attributes to certain values based on field data on the account
Hi Alex, Yes but it not as simple, it requires custom apex code (a trigger) or maybe a flow to pass the account field information to the field where attribute values are saved (possibly Ad Quote line item or Ad Order line item or Order line item or Quote line item depending on the flavor you are using). IT’s a quite a hassle and it’s not a perfect workaround.
thanks for the reply
so i would use a flow to update a picklist on the Quote Line Item
How can i match this custom field to the attribute i want to manipulate in the Cart?
I have the same issue, and cannot find a workaround/alternative! It’s crazy that Salesforce/Vlocity does not support out-of-the box such types of mappings.
Vlocity is an unfinished product that was launched before it’s time. Sadly.
How is it possible to update the “upstream” records? For example, i have managed to implement Attribute Binding and make it functional to OrderItem entity. But i want to do it to Order as well. How can this be achieved? I tried the same steps (new Object Type for Order), but didn’t work.
You could do another binding, same attribute, but to Order object and then a field in Order. Or.. you could do an autolaunched flow that updates the upstream field, triggered by changes in that field in orderitem.
“You could do another binding, same attribute, but to Order object and then a field in Order”
This is not supported, i got confirmation by Salesforce support.