
Salesforce Maps uses the address information from the record to place markers, but some are misplaced and you need to move a marker manually to match with the true location that might be right across the street or just a little bit more to the right. This manual adjustment is called a Verified Location.
First, Setup Verified Location
Create necessary fields for Verified Location
- In the Salesforce Org, go to Setup > Object Manager. Enter into the base object you’re using to plot the markers in Salesforce Maps
- Go to Fields & Relationships tab and click the New button on the top right
- Choose Number and click Next
- Fill out the information:
- I named it Verified Latitude because it made sense
- Length: 3
- Decimal places: 15
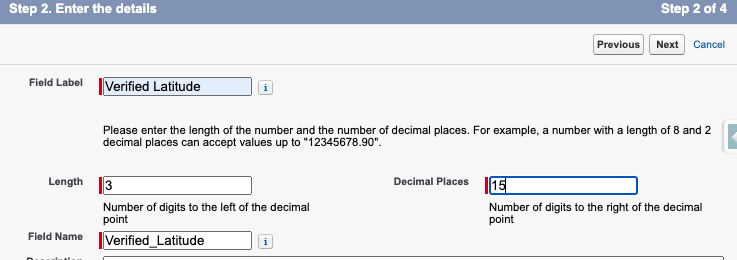
- Click Next
- Make sure the field is visible to at least your own Profile and click Next
- Choose whether to add it to a page layout or not (up to you, you’ll only use this field from Salesforce maps interface)
- Click Save
Repeat steps 3-8 to create another field called Verified Longitude
Add Verified Location button to Salesforce Maps interface
- Go to Setup and type in Installed Packages on the quick search bar and click on it
- In the Installed Packaged table, find Salesforce Maps and click on Configure
- In the Settings tab, click on Button Sets
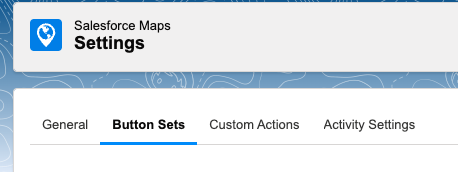
- On the Button Set dropdown, choose Maps Buttons, which is the default. You can additionally create a new one if you please.
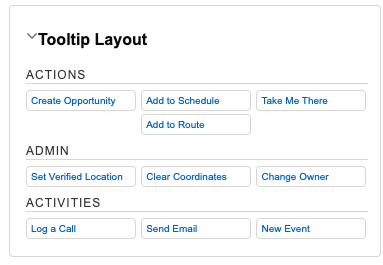
- In the Layout section below, find the Set Verified Location button and drag it to the Tooltip Layout wherever you want and drop it
- Click Save in the bottom of the page
Configure Base Object to use Verified Location coordinates
- Go to Setup > Installed Packages > Salesforce Maps > Configure > Base Object
- Click on the Edit Existing tab
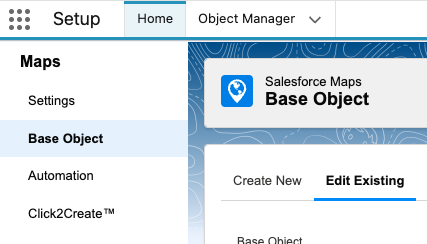
- In the Base Object drop down list, click on the desired Base object that is being used for the marker layer
- Scroll down to the Address and Coordinate Fields section
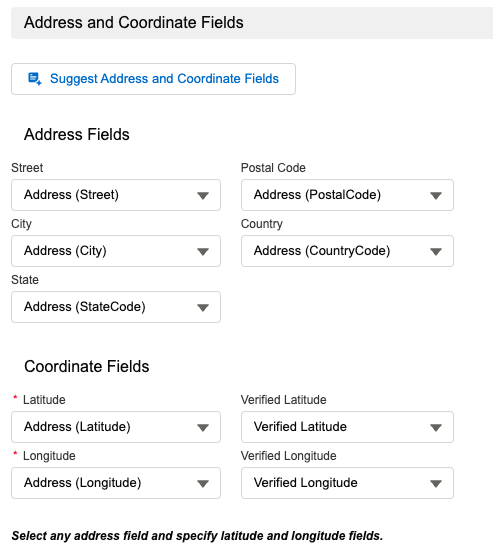
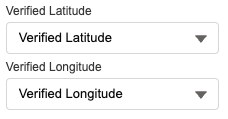
- In the Coordinate Fields subsection, set the Verified Latitude and Verified Longitude to the respective fields you created
- Scroll all the way down and click Save
How to set a Verified Location to move a marker in Salesforce Maps
Now that everything is ready, open Salesforce Maps and make sure the Marker layer you want to modify is open and plotted on the map.
- Click on the marker you want to move and click on the Actions tab. You’ll see the tooltip with the options you added
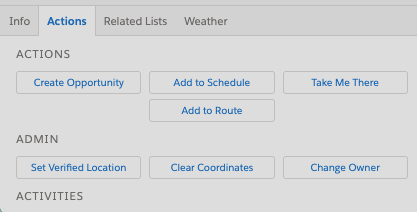
- Click on Set Verified Location. The marker will turn semi-transparent.
- Grab the marker and move it to the desired location.
- Once you drop the marker, it will become opaque and set in the location, the latitude and longitude of this new location will be set in the Verified Latitude and Verified Longitude fields you previously created on that particular record
- Done. that’s all it takes to move a marker in Salesforce Maps
You can also differentiate markers by using different colors or marker modes or changing the color of KML shapes you’ve loaded in other layers. Keep in mind that this method won’t work for things you load from KML files.
Was this article helpful?
YesNo